
Get SHE’S Daily Newsletter | Subscribe Here


Cute Pumpkin Painting Ideas That Are Cute, Creative, and Easy to Try
Disclaimer. Some images featured in this article may originate from third-party sources and are used for illustrative purposes. Please review our Image Credits Policy for attribution information.
Published on August 27, 2026
Posted by
Lena
 Verified by Caroline West
 Caroline West
Editor in Chief, She Magazine
Caroline oversees every piece of content published on She Magazine, ensuring it meets our editorial standards for accuracy, tone and quality before it goes live.
Our Editorial Standards
Leave a comment
Caroline West
Editor in Chief, She Magazine
Caroline oversees every piece of content published on She Magazine, ensuring it meets our editorial standards for accuracy, tone and quality before it goes live.
Our Editorial Standards
Leave a comment
Verified by Caroline West
Caroline West
Editor in Chief, She Magazine
Caroline oversees every piece of content published on She Magazine, ensuring it meets our editorial standards for accuracy, tone and quality before it goes live.
Our Editorial Standards
Leave a comment
Pumpkin carving will always be a fall classic, but pumpkin painting gives you much more room to be creative.
You can go floral, spooky, colorful, funny, elegant, or completely unexpected without dealing with carving tools or pumpkin mess. Painted pumpkins also work beautifully for indoor decorating, porch displays, kids’ activities, and fall craft nights.
For the best results, clean your pumpkin first and let it dry completely. Acrylic craft paint is usually the easiest option, while paint pens are helpful for small details like eyes, outlines, lettering, and tiny flowers.
In this article
- Dark Botanical Decoupage Pumpkin
- Pressed Flower Pumpkin Painting
- Tiny Ghost Pumpkin
- Colorful Candy Character Pumpkins
- Cartoon Pumpkin Family (SpongBob)
- Modern Floral Pumpkin Painting
- Retro BOO Pumpkin Painting
- Bright Cartoon Couple Pumpkins
- Mini Nerdy Character Pumpkin (Harry Potter)
- How to Make Pumpkin Painting Look Cleaner
- How to Keep Painted Pumpkins Looking Fresh
- Make It a Fall Craft Night
- Choosing the Right Pumpkin Painting Style
Dark Botanical Decoupage Pumpkin

This first pumpkin painting idea has a nice, vintage look that feels much richer than a typical orange-and-black Halloween design.
The dark base makes the pink flowers, green leaves, butterflies, and botanical details stand out beautifully. It almost looks like an old floral wallpaper pattern wrapped around the pumpkin.
To recreate it, start with a deep charcoal or black base coat. Once it dries, layer on floral details using paint, decorative paper, or a combination of both.
You do not need to place every flower evenly.
In fact, letting the flowers overlap and spread naturally across the pumpkin makes the finished design look more artistic and less manufactured.
A bronze or antique-gold stem is the perfect finishing touch because it adds warmth against the dark background.
Pressed Flower Pumpkin Painting

This design feels soft, delicate, and much more garden-inspired than spooky.
The combination of white, pale blue, and orange pumpkins covered with small flowers and greenery creates a really pretty fall display.
Instead of painting every flower by hand, you can use dried or pressed flowers.
Apply a tiny amount of decoupage medium, place the flower carefully, then brush a very light layer over the top.
The secret is leaving enough empty space.
If every inch is covered, the design can start to look cluttered. Scattered flowers make each detail easier to notice and give the pumpkin a fresh, airy feel.
This pumpkin painting idea would be beautiful for an autumn Outdoor Tea Party, or even beside a colorful Flower Garden.
Tiny Ghost Pumpkin

This is one of the easiest ideas in the group, but it still has plenty of personality.
The natural orange pumpkin is covered with small white ghost shapes, each with tiny black eyes and mouths.
Start by painting simple white blobs around the pumpkin.
Do not worry about making them identical.
Some ghosts can be taller, some wider, and some slightly crooked. Once the white paint dries, use a tiny brush or black paint marker to add the faces.
Changing the expressions makes the design even better.
One ghost can look surprised, another sleepy, and another slightly confused.
This is a great pumpkin painting project for kids because the basic shapes are simple enough that they do not need perfect brush control.
Colorful Candy Character Pumpkins

A whole group of painted pumpkins can turn your porch steps into a playful Halloween display.
Each pumpkin gets a bold base color, such as red, yellow, orange, blue, brown, or green. Then oversized cartoon eyes, eyebrows, mouths, and white candy-style lettering bring each one to life.
The expressions are what make this idea so fun.
Give one pumpkin sleepy eyes.
Make another look shocked.
Let another have an exaggerated smile.
Using different expressions makes the collection feel like a group of characters.
Apply at least two coats of base paint if needed, especially with bright colors.
Once the background is completely dry, lightly sketch the face before adding black and white details.
This kind of pumpkin painting works especially well on stairs because the pumpkins naturally create a layered display.
Cartoon Pumpkin Family (SpongBob)
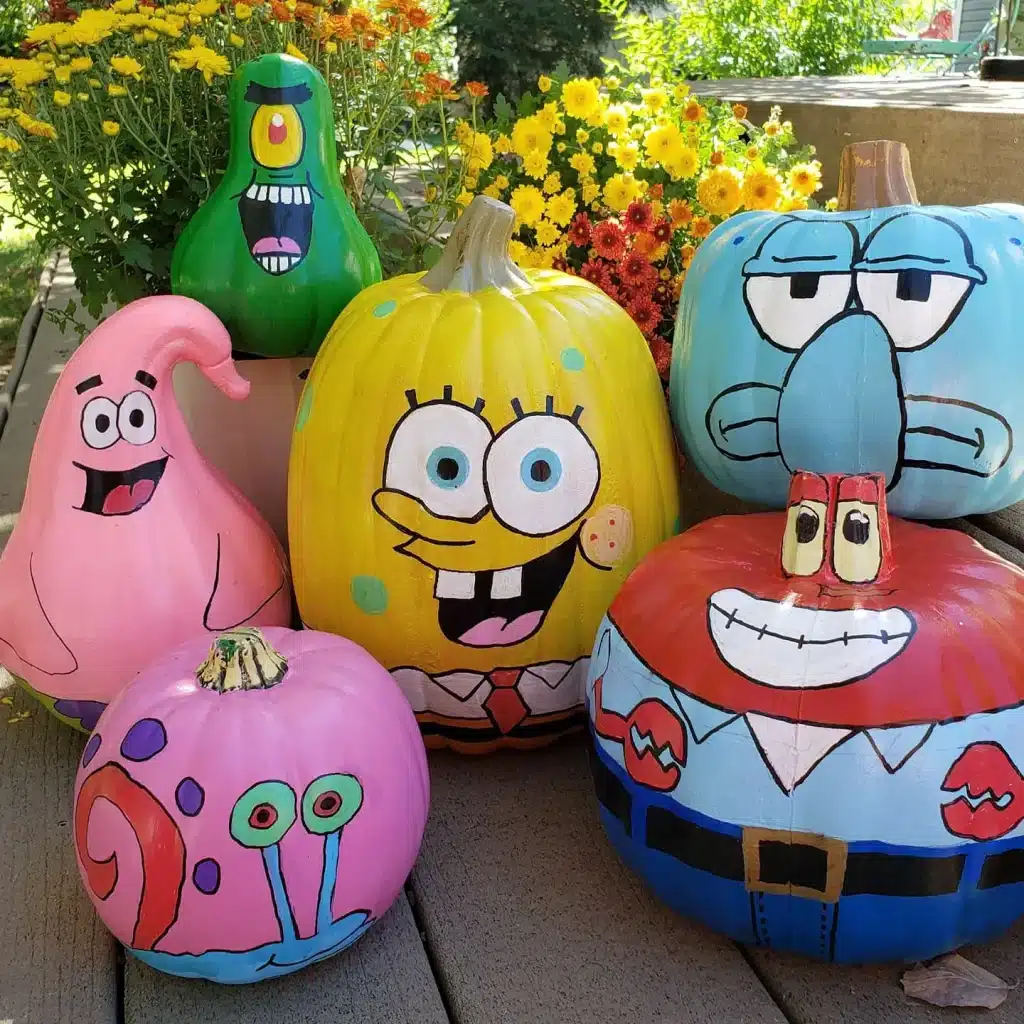
This idea takes character painting even further by turning several pumpkins into an entire cartoon scene.
Different pumpkin shapes are actually an advantage here.
Tall gourds can become narrow characters, wide pumpkins work for larger faces, and smaller round pumpkins are perfect for supporting characters.
Paint each pumpkin with one main color first.
Then add the biggest features, like eyes and mouths, before moving on to smaller details.
Using black outlines around the characters makes everything look cleaner and more animated.
You do not need to copy any character perfectly.
The shape of the pumpkin will naturally change the proportions, and that slightly handmade look is part of what makes the display fun.
It is also a great idea for families looking for screen-free summer activities that can transition into a fall weekend project.
Modern Floral Pumpkin Painting

If you want something less Halloween-specific, this floral design is a beautiful option.
The soft cream background creates a calm base for dark green branches, pink flowers, mustard accents, and small coral dots.
Then create several flowing green stems around the surface.
Add leaves first and flowers afterward.
This helps the composition feel connected instead of looking like random flowers scattered around the pumpkin.
Try limiting yourself to just a few flower colors.
Too many shades can make the design busy, while a controlled palette gives the pumpkin a more polished look.
Retro BOO Pumpkin Painting

Lettering can make a pumpkin feel bold without requiring an extremely detailed design.
This one uses a large “BOO” graphic in the center, surrounded by bats, stars, clouds, and tiny decorative marks.
Start by painting a pale lavender or white background shape behind the letters.
Once it dries, add thick black lettering on top.
You can lightly sketch the word first if you are worried about spacing.
Do not try to make the letters perfectly straight.
A slightly uneven hand-painted style actually suits this design better.
Small bats and stars can then fill the empty areas without making the pumpkin look overcrowded.
This pumpkin painting idea is perfect for an outdoor setup with hay bales.
Bright Cartoon Couple Pumpkins

Two pumpkins side by side can become a fun matching pair.
One is painted bright green and the other vivid pink, with large expressive faces and simple gold crowns.
The crowns make the design stand out because they add a three-dimensional element instead of relying only on paint.
When recreating this idea, start with the eyes.
Because the faces are so large, the eye placement will determine where everything else goes.
Once the eyes are finished, add eyebrows, mouths, teeth, lashes, and smaller facial details.
Use a thin black paint marker for the fine lines.
This pumpkin painting idea would be especially fun for siblings, friends, or couples decorating pumpkins together.
Mini Nerdy Character Pumpkin (Harry Potter)

Small pumpkins can still have a lot of character.
This tiny design keeps things simple with round glasses, dark painted hair, bright eyes, and one small red-and-gold detail.
Because the pumpkin is so small, the design works best when you focus on only a few recognizable features.
Paint the top section black to create the hair.
Then use a very fine paint marker to draw the glasses.
A regular brush can feel too bulky for details this small.
Mini pumpkins are perfect for desks, bookshelves, or a seasonal home office decor setup.
How to Make Pumpkin Painting Look Cleaner
The pumpkin you choose can make a big difference.
Smooth pumpkins are easier for lettering, cartoon faces, and fine details because the brush does not have to travel over deep grooves.
Always clean the surface first.
Dust and dirt can stop paint from sticking properly.
For detailed designs, lightly sketch the main shapes before painting.
Use very light pencil marks so they do not show through pale colors.
Work from large sections to small details.
Paint the background first.
Then add the main shapes.
This simple order will make almost any pumpkin painting project look cleaner.
How to Keep Painted Pumpkins Looking Fresh
Start with a firm pumpkin that has no soft areas.
Keep the stem attached and avoid pumpkins with cracks or damaged skin.
If the pumpkin is going outdoors, a covered porch is much better than a spot exposed directly to rain.
Indoor pumpkins should stay away from strong heat sources such as radiators or fireplaces.
Once the paint is completely dry, you can also apply a clear craft sealer.
Make It a Fall Craft Night
Pumpkin painting is even more fun when everyone creates a completely different design.
Set up a table with acrylic paints, brushes, paint pens, paper towels, cups of water, and pumpkins in several sizes.
You can even divide the table into different inspiration areas.
One section could focus on flowers and botanical patterns.
Another could have ghosts and Halloween designs.
A third could include bright cartoon colors and funny faces.
Choosing the Right Pumpkin Painting Style
Think about where you want to display the finished pumpkin.
For indoor fall decor, the botanical, pressed-flower, and modern floral designs feel the most versatile.
For Halloween porches, the ghost, witch, BOO, and colorful cartoon pumpkins will stand out much more from a distance.
For kids, large shapes and funny faces are usually easier and more enjoyable than detailed illustrations.
And if you are unsure where to begin, start small.
A mini pumpkin gives you less space to overthink the design.
The best pumpkin painting ideas are not necessarily the most perfect ones.
Hand-painted details, uneven expressions, unexpected colors, and slightly crooked lines are often exactly what give the finished pumpkin its charm.
Whether you choose flowers, ghosts, cartoon faces, bold lettering, or a whole collection of colorful characters, the goal is to make something that feels fun, personal, and worth displaying all season.